Signal LCC Firmware C2b Update.
Be sure that you are using JMRI version 4.14 or later.
Using Firefox, Google Chrome, or Safari, (NOT
Microsoft Edge) download the latest firmware
files, SignalLCC_C2b_UPDATE.hex to your local machine.
Note that this upgrade will
not disturb your existing configuration data which is stored in a
different NVR chip.
C2
Updates Include:
- In the CDI Configuration Tool, writing the Node Description field
erased the I/O-Line-1 Description field; now fixed;
- A Node Power Monitor is added; the R/B/G leds remain lit if the node
voltage is above 3.0V, but below ~4.4V and the node will not startup;
- If the node voltage is above ~4.4V for more than 1 second, the R/B/G
leds will go dark, the node initializes its alias and starts normal
operations;
- If the node voltage drops below ~4.4V, the node is de-initialized and
a user-configurable (optional) 'PowerNotOk' event message is sent
(power_option > 0); the node reboots within 50ms (de-initialization
means the node inhibits all CAN-bus messages (except 'PowerNotOK') and
FRAM read/writes); the PowerNotOK eventID is stored in EEPROM, so it
doesn't need to access FRAM in a low power situation;
- On reboot from PowerNotOK (brown-out), the well-known 'Node Power
Failed' message and user-configurable (optional) 'PowerOK' message are
sent;
- On (re)boot from any other event (power on, reset message, firmware
download, factory reset) these 'power-failed' messages will not be sent;
- The node Alias is now saved to EEPROM; upon (re)boot this stored alias
will now be used instead of freshly allocating it from the NodeID and
risking an alias 'collision' with other nodes, causing multiple nodes to
re-allocate their alias; this can be useful on CAN-bus power dropouts,
where one (or more) node(s) may reboot where others continue to operate;
- The CDI XML is partially re-written to get rid of the 'Child'
references in the CDI Configuration Tool;
- All previous updates and fixes through C1e.
C2b
Updates Include:
- Flasher synchronization.All lamps on the same mast now flash together.
(per the prototype)
IMPORTANT NOTICE: Because the CDI now uses different names for
many variables, all existing CDI backup files created with older node
firmware (before rev. C2) have become outdated. The C2-UPDATE doesn't
affect your existing configuration at all, so it is strongly advised to
create a new backup file immediately after updating to rev. C2.
Firmware
Update process:
Note: This version of the Signal LCC update loads both
the new firmware and
the new CDI at the same time. This means that you
will no longer need to do a dual upgrade as was previously required for
the early versions of the Signal LCC.
When ever an update to your Signal LCC firmware is needed, a
program such as "Firmware Update" in JMRI version 4.14 or later is
required. Download the latest firmware files to your local JMRI User
Files folder or someplace where you can easily access it.
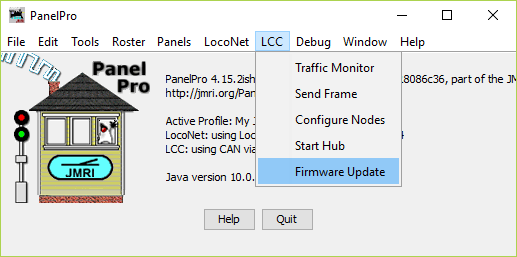
To enter Firmware update mode:
-
Start JMRI and select "LCC".
- Select ‘Firmware Update’
from the LCC drop down list.
-
Click ‘Select’ to pick a firmware file.
- From the file menu, select: 'SignalLCC_C2b_UPDATE.hex'
or the latest upgrade available.
- Select your 'Target Node ID'.
- Optionally you may check the
‘Lock Node’ check box to take the node off line during the upgrade.
- Click the 'Load' button to
initiate the download to Signal LCC revision C2.

- Wait until 'updating device
firmware..' progress bar is complete and shows 'Operation Complete'.
- Once the operation is
complete, open the OpenLCB Network Tree window. (LCC-Configure Nodes)
Then click on 'Open Configuration dialog for the just updated node.
- The updated node should now
show 'Mod: Signal-LCC' and 'Software Version: rev-C2' in the Network
Tree view, and Software Version: rev-C2 in the CDI view.
- Any errors will be shown in
the lower window ticker tape display.
Normally
upgrades to the Signal LCC node may be accomplished without actually
accessing the board itself. However if the node does not automatically
enter boot mode and start the upgrade it may be forced into boot mode
by un-powering it, then holding down the ‘Gold’ button as you power it
up again. The gold LED should start flashing to indicate that it is in
forced boot mode. This will also likely be required after a failed
upgrade attempt.